Tuesday, 20 December 2011

Cupcakes in ice cream cones

Cupcakes in ice cream cones make a great treat for kids and they are so easy to make. They are nice surprise for the end of the school year, bake sales or feasts.

Ingredients:
  • Ice cream cones with flat bottom
  • Cake mix or your cupcake recipe
  • Cream

You will make your classic cupcake dough or just use cake mix, if you do not have time or mood. Place your ice cream cones on a baking tray and fill them to about 2/3 with cake dough.


 Then bake. I baked on 350F/180C for about 20 minutes.


When cooled, just have fun decorating them and serving them. My kids loved them and because they brought them at the end of school year to school, I got orders from their friends for the end of school next year. :-)


Thursday, 15 December 2011

No paper to draw

I don't know how about you, but we have tons and tons of paper used just for drawing and writing activities. Every now and then I have to go through the pile of pictures of rainbows, butterflies, flowers etc. and throw them out to recycle bin. I'm trying to cut down our paper usage, but how to keep kids happy while still trying to keep environment happy too? Well, in the end, the solution was pretty easy and quite cheap. Yes, it does not have all the features as paper does, but for lazy older girls that don't feel like colouring their artwork, it is perfect. It is also enough even for our writing activities.

So what do we need?
  • Clear plastic pockets used for binders (if you are not sure what I mean, here is picture)
  • Dry erase marker (white board markers are quite strong and leave smudges, so I do not recommend those)
  • Tissue to clean up

I love these, because they are easy to clean and don't leave smudged surface like white boards. Younger kids can trace letters, shapes... well anything and from everything. With older kids you can have spelling, math and writing competitions. It is just as much fun as paper, except colouring part is a bit tricky here.

Here are some activities in action.


Tuesday, 13 December 2011

Storing scarfs, shalas...

When you hijab/scarf/shala collection grows, so does the storage problem. Keeping them folded in a closet is one option. However I did find this following second option much more practical as it takes less space and it is much more visual when choosing, what to wear. It is also very inexpensive way, how to store mostly your summer hijabs, because they are very light.

Now, what do you need? Only a strong hanger and couple of shower rings. You can place the shower rings in a row, or (as I did) you can join couple of them creating a row. If you can not find a good strong hanger, just use two hangers at once or less scarfs on each hanger.


Monday, 12 December 2011

Keeping track of your kids - cell free


Here is my tip on how to keep track of your kids whereabouts.

I'm not a big fan of cells as sometimes I feel there are more negatives then positives and still lot of unknowns. But I still needed to find a way, how to keep track of my son's whereabouts, when he goes out with his friends. On the list of presents he wanted for eid (Festival of the Fast Breaking) was a talkie walkie. In the end, I think it was one of the most useful presents we ever bought and I totally recommend it.

Talkie walkie is definitely cheaper to manage than cell. Because of the limited distance it broadcasts (not like cell), he has to keep around the house. We always make a signal check, when he arrives to his destination. 

It is also very useful gadget even for family trips (to talk between cars, amusement parks - especially if you have only one cell in family), and a lot of fun for kids.

So if you are not as crazy about cells for kids as me, talkie walkie is a very good solution with multiple usage. 

How do you keep track of your older kids, those who need more space than your garden can offer? 

Sunday, 11 December 2011

Un-cloging a blocked drain

Drains can be clogged by list of things. I found very easy, cheap, ecologic and effective way, how to clean drain that is clogged due to hair and dental floss, in practically no time at all.

We need:
  •  clogged drain (of course)
  •  skewer
  •  piece of toilet paper to clean the mess

How:

Insert skewer into the clogged drain.Turn and turn and turn .... then pull out and clean your skewer and redo the process till your drain is nice and clean. Because of the length of a skewer, you are able to go pretty deep. Let me know, if it worked for you as well as for me.


Insert the skewer into your drain, be careful not to drop skewer when pulling the "cotton candy" out.


Saturday, 10 December 2011

Different ways how to pizza


Everybody knows pizza, but sometimes it is fun to presented other than traditional way. So here are some tips.

Firstly, let me give you my very best pizza dough recipe. I love this dough. I tried many, but in the end, I stayed with this one.

Ingredients:

  • 5 cups of all purpose flour (mix it up with different flours)
  • 1. 1\2 cup warm water
  • 1\2 cup vegetable oil
  • 2 tbsp powder milk
  • 3 tbsp yeast
  • 1 tbsp sugar
  • 1\2 tsp salt

Instructions:

Knead all the ingredients together.  Let rise min 30 minutes. Then use your imagination. Bake at 480F/250C for about 15 minutes till golden.


Traditional pizza

Classic


Cake pizza

Dough is rolled and then placed in cake tin to bake.


Pizza with balls

Balls are filled with cheese


Calzone pizza

Before baking
Sunshine pizza
Sunshine pizza


Plants display - 3 tips

We do not have very sunny apartment, so I'm kinda limited as to where I can put my plants. My painted nettle grew so much that was not practical at all keeping it in the window. My dear friend recommended to me hanging it. Well, that is a very good idea, but the only problem are huge holes that I would have to make in order to hang them. So in the end I found a compromise.


Tip no. 1

Ingredients:
  • one used flower pot with holes
  • cord / yarn (anything strong)
  • plant
  • hook


Tip no. 2


Ingredients:
  • rattan flower pot
  • wire
  • nail
  • plant


 Tip no.3

Shape your hanging plants by using a wire.


Little treasure box aka pin storage

Pins are my pain. I'm hijabi and all my girls (except the youngest) are hijabi too. May God bless them. I wanted to store them some kind of nice and elegant way. I don't mind my sewing pins being in a pile, but pins I use I like to have a bit organised, so I don't end up with blue shala and one yellow and one pink pin, because blue pins are nowhere to be found. In the end I found a nice jewellery box that was turned into a pin storage. So here is a tip, how effectively store your pins.

Here is my very cheap treasure box. Of course you can use any kind of box.

I have placed inside a small cushion I made out of scrap material, followed by the pins organised by colour. I made the cushion a wee bit smaller, because some of my pins have chains on them, so the chains can fall in to the tiny gap at the back.


Friday, 9 December 2011

How to stop sucking thumb

Aah, sucking thumb, what a disaster. While they are babies it is really nice and easy tool, how to keep your kid a bit calm. However if you pass a year with a thumb, it is very hard to get rid of it. Two of my kids were thumb sucking. First one got rid of nigh-sucking on its own by the age of 8.I have tried everything with him. EVERYTHING.... in the end, it was his own will. Praise God.

But the other one... she is 8 now and even though she does not do it at all during the day for many years, she is not able to stop during the night. As for reasons... "there is a water coming to my mouth and I have to drink it by using the thumb..." Surprisingly both had the same excuse.

Anyways, our dentist insisted on terminating this bad habit. She told me that now it is only habit, uncontrollable habit. She is just doing it subconsciously, so there is nothing really I can do, except make sure, she is not able to bend her hand in the night. So I went for quest around our house, to find something suitable. I found a crisps (chips) box. Like the one from Pringles. I cut it short, made two holes, added yarn and safety pin.
 
Results? Well, we are still  working on it. Every time I took it off, she came back, so this time I'm sticking to a minimum of a week. But her teeth got much better as they have been trying to grow crooked.

So how does it work?
1. Get a suitable round box or make one from cardboard. Make one or two holes (you can use knife, scissors, screwdriver etc.) Put some yearn through, so you can attach the safety pin.


Place it on to the hand of your victim.


3. Secure it with the safety pin to the pyjamas. One side should be enough. If you need, secure in two different places and wish sweet dreams to your loved one.


Salty dough day

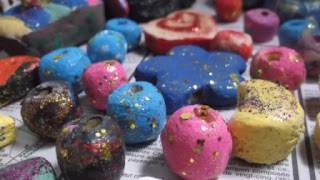
I wanted to something with the kids for a while. They have been bugging me a lot, since my studies take so much time. So I have reserved one special salty-dough-day just for them. Actually it took us longer then just a day, because half a day they have been sculpturing and the other half was the dough drying. Well and then another day to paint. I guess if you have one or two kids, it does not have to take so much time. Anyways, kids loved it and enjoyed it, so I would definitely recommend this activity for rainy or snowy days. It is inexpensive, fun and creative. Our kids, from the age of 4 up to 11 enjoyed it a lot. So it is also activity that the whole family can do.

Here is a basic recipe for a salty dough. If you have more kids, don't forget to double the amount.


Ingredients:
  • 1 cup of fine salt
  • 2 cup of flour
  • 1 cup of water (may add more)
Instructions:
  • In a large bowl, combine the salt and the flour
  • Make a well in the salt/flour mixture and add the water
  • Knead until smooth and shape into a ball or simply just use your kneading machine
  • Cut out different shapes, sculpture whatever you like, use your imagination and have fun
  • If not used all, wrap leftovers in plastic or store in an airtight container 
  •  Dry for 48 hours or just put in in the oven 250F, 1 1/2 - ... hours, depending on the size (our monsters took monster time to bake)
Tip:
  • Do not let your kids eat it, lick their fingers, touch their eyes....
  • For beads, make sure your holes are quite wide. For us skewer worked well.

So first we rolled and shaped the dough 


Everything is baking. Because I was not able to fit two pizza tins into the oven, I used muffin tin to raise one higher. So this way I was able to bake them all. 


One painting tip for the beads. You can just put them on a pencil and this way you can paint the whole thing at once.
 

And here are our results. Monsters went to kids' teachers and the rest stayed at home. 


To assemble necklaces I used scobidoo and tied a knot in between every bead and a necklace wire.


Welcome

My little twist to famous Chef Gusteau (Ratatouille) saying:


Not everyone can become an artist, but a great idea can come from anywhere!


So welcome to my blog and God willing, be back very soon....